This past weekend was Crazy Hair Night at AWANA. The girls were so excited and we had so much fun thinking about what kind of crazy things they could do. They put headbands on backwards. Stuck ponytails straight into the air. We even went to the store and looked at the spray in hair colors. However, we decided to go the old fashioned route. Taking from Laura Ingalls Wilder we tried our hands at rag curls. I received so many comments on the girls hair that day/night that I wanted to post some instructions. This is very photo heavy but I hope it helps you to understand how fun, safe and easy this is {no big scary, hot curling irons}! First – the finished product.

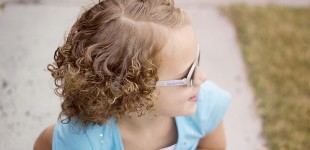
Here is a photo from last year so you can get an idea of what her hair is normally like.

Pretty straight. She’s got some lofty curls but clearly nothing like when we rag curled it.
Now, you’re going to see a bunch of different photos. They were all taken over three days. The first night when the actual curling was done. The next day for the big reveal. The day after I had my daughters pose so we could get some good visuals to go along with the instructions.
Let’s begin!
First thing you’re gonna want to do is cut up an old clean t-shirt. The pieces we cut were about 1 inch by 7 inches. Or the length of your hand.


Cut about thirty of them. I went hog wild and cut the entire shirt knowing we’d use some and lose some. Plus with this many girls we can always use extra. These do not have to be perfect. Any size will work.
Now you’re gonna want to start a movie. This whole curling thing can be a kind of long process. Especially the first time around. Once you get the hang of it it won’t take as long. For three kids it took one Prince of Egypt and part of The Lion King. It is best to start with a wet head or you can do what we did and use a bottle of water to spray on each section.
Take a section of hair. Whatever size you want. I haven’t tried it but I assume you’ll get different looks based on how big a section you work with at a time.

Make sure you get it wet. Then add a little poof of mousse. This will help the curl to hold the next day.

Work the mousse into the hair. Get it all the way from the roots all the way down to the tip.

Take a piece of your fabric and place it underneath the strip of hair.

Take the end and wrap it around the fabric. This gets tricky when the hair is uneven but don’t worry too much about it. When it’s all curled up you won’t be noticing the tips all that much.

Next you’ll curl it under, up to the scalp.


Once you get to the top all that’s left is to tie it off. And trust me, it holds! Don’t double knot it.


And that’s it! Once you complete the entire head it’s time to go to bed and let time do its work. Here are some photos my dear husband took the night we first rag curled.


Below you can tell it was getting late and the little ones were awfully tired.

Good morning! Time to wake up and take those rags out! If you’re anything like me, when you take the rags out you’re gonna be kinda disappointed.

It looks pretty but certainly wasn’t what I was expecting. So I nervously spread my fingers and raked my hands through her hair. And boy did it poof up!

I then quickly attacked it with lots and lots of hair spray! {later that evening we sprayed it with glitter because, after all, it was crazy hair night}
Here are photos of the other girls. Again, both have hair similar. Straight yet slightly wavy.


I hope you take the time to try this. I have yet to put a curling iron on my daughters hair and would like to stay away from doing that as long as possible. This, on the other hand, was a fun change up for them. They’re talking about trying it on each other without Mama’s help. And just so you know, this can be done without mousse. It just won’t hold as well. Here is a photo from when I tried this about four years ago without any hair products. I also made the curls much looser.

Have fun and happy curling!
Blessings!